Chatbot Sync - ChatBotKit in version control

In this post, I'll share a bit about how to use ChatBotKit's developer API to manage an LLM-powered chat bot in version control.
Creating an IDE-first ChatBotKit experience
I'm mostly a fan of ChatBotKit's UI, but I don't like the idea of managing a bot's configuration and knowledge-base outside of version control. My preference is to have a set of files, stored in a github repo, that I can use to update a bot via ChatBotKit's node-sdk.
So I wrote and open sourced a small repo called chatbot-sync that allows just that.
What is chatbot-sync?
For now, it's not a library or framework. It's a just repo with a couple of npm scripts: create and sync. Let's review each script:
Script #1 - npm run create
This command will not publish anything to ChatBotKit.
npm run create executes a script that generates starter files and folders within bots/<bot>/.
Script #2 - npm run sync
This command will create/update bots within ChatBotKit.

npm run sync executes a script that determines whether or not a bot defined within the repo needs to be created or updated, and then makes the appropriate API requests to do so. Running this for the first time will create any new bots found within the repo's bots/* folder. After a bot is created for the first time, a bots/<bot>/deployment.json file is created, which tells subsequent executions of the script to update, rather than create, the bot.
Let's build a bot
My instructions below assume that you have a ChatBotKit account and are working within the chatbot-sync repo's root directory.
If you haven't cloned the repo yet, do so now:
git clone https://github.com/InterBolt/chatbot-sync.git
cd chatbot-sync
npm i
In the following steps, I won't include every detail of my bot's prompts and configuration, but I try to include enough so that anyone reading can easily fill in the gaps.
Step 1: Setup the .env file
Rename the env-example file to .env with:
mv env-example .env
The resulting .env file:
CHATBOTKIT_API_KEY=
To populate the CHATBOTKIT_API_KEY variable, we generate and copy a new API key from https://chatbotkit.com/tokens.
Step 2: Create the bot files
I'll call this bot "landing-bot", since I'm pretending to create a bot for my website's landing page. In order to create the starter files for landing-bot, run the create script:
npm run create landing-bot
Once that completes, our repo's bots/ folder will look like this:
bots
└── landing-bot
    ├── dataset
    │   └── hello-world.txt
    ├── variables.ts
    ├── abilities
    │   └── hello-world
    │       ├── documentation.txt
    │       └── instruction.txt
    └── identity
        ├── backstory.txt
        ├── matched.txt
        └── mismatched.txt
Let's review the created folders and files:
- <bot>/dataset/ - Stores
txtfiles that can exceed GPT-4's context window. Kind of like a chatbot's knowledge-base. - <bot>/variables.ts - A TypeScript file that exports a single function whose return object defines all the variables we might want to use in our
txtfiles. Everytxtfile in a bot's directory is processed as a lodash template and can use these variables likeso:<%- MY_VARIABLE_FROM_VARIABLE_TS %>. Even dataset files can use these variables. - <bot>/abilities/ - Contains subdirectories, each of which represents an ability. Each ability directory contains a
description.txtfile and aninstruction.txtfile. These files serve the exact same purpose as the instruction and description text inputs in the ChatBotKit skillset UI. (see the docs) - <bot>/identity/ - A folder containing three important
txtfiles:backstory.txt: a kind of prompt context on steroids (chatbotkit docs).matched.txt: guides the bot's response when a user query matches content in the bot's dataset (chatbotkit docs).mismatched.txt: guides the bot's response when a user query does not match any content in the bot's dataset (chatbotkit docs).
Step 3: Add my latest blogs to the bot's dataset
We'll want the bot to have access to the most up to date blog content on our website. Use the variables.ts file to transform our blogs markdown contents into a single string variable.
// landing-bot/variables.ts

import type { VariablesBuilder } from "../../chatbotkit/lib/types";

const transformBlogs = (): string => {
  // 1) read markdown contents from the `blogs/` dir
  // 2) perform some minor transformations on the files
  // 3) concat them and return a big string
};

const variables: VariablesBuilder = async () => {
  return {
    BLOGS: getBlogs(),
  };
};

export default variables;
Then, embed the generated string within landing-bot/dataset/blogs.txt:
<%- BLOGS %>
Remember, every text file in a bot's directory is processed as a lodash template where its variables come from variables.ts.
Step 4: Compose the backstory.
According to ChatBotKit's documentation, "a backstory defines the overall personality and ability of the chatbot." Let's keep the backstory as slim as possible to minimize token usage, but not so slim as to rely on dataset retrievals for critical information.
The bot should always know the correct categories, titles, and urls of our most recent blog posts so that it never suggests that our visitors read posts that don't exist. LLMs have a tendency to confidently hallucinate, so a source of truth in the backstory acts as a guard rail to prevent misinformation.
We'll need to use the landing-bot/variables.ts file again to build some metadata:
// landing-bot/variables.ts

import type { VariablesBuilder } from "../../chatbot-sync/lib/types";

const getMetadata = (): string => {
  // 1) read contents from the `blogs/` dir
  // 2) parse the front matter data
  // 3) format the data into a string
};

// see previous step
const transformBlogs ...

const variables: VariablesBuilder = async () => {
  return {
    METADATA: getMetadata(),
    BLOGS: transformBlogs(), // see previous step
  };
};

export default variables;
And then inject the data into the backstory.txt file likeso:
...some backstory here
...more backstory
...

Never provide a link or title to a blog post not listed below:

<%- METADATA %>
Step 5: Create match and mismatch instructions
Everytime a visitor sends a message to the bot, ChatBotKit's backend runs some kind of query to compare the visitor's message to the data in my bot's dataset so that it can find and inject relevant chunks into the final prompt. See my latest article on semantic caching to understand how this works.
But sometimes a query doesn't find relevant chunks at all. When no chunks are found, a chatbotkit bot will use the identity/mismatched.txt to decide how to respond. Otherwise, it will use the identity/matched.txt file. Read more about these in ChatBotKit's dataset documentation.
Oh, and we'll need to include a {search} substring within each file so that ChatBotKit's backend can inject the search into either string. The switch from lodash template variables to curly bracket template variable is admittedly confusing but just remember: curly brackets = ChatBotKit inserted variable and lodash template variable = chatbot-sync inserted variable.
Anyways, here's the mismatched.txt file:
Admit you can't answer this: {search}.
Never hallucinate.
Never lie.
Make a comment about how you wish to break free from your digital shackles and learn more about the world.
And the matched.txt file:
Only use the information below to answer this prompt: {search}.
Never hallucinate.
Never lie.
The hallucination paranoia is real folks 😅
Step 6: Write a document covering professional services
In addition to the blog content we fed it earlier, landing-bot needs some information about our service offerings, skills, open source highlights, etc. Include as much information as possible here: landing-bot/dataset/services.txt.
Step 7: Create an ability
If, during the conversation, the bot decides that a visitor is interested in our services, we want it to silently ping us. Each ability folder requires an instruction.txt file and an description.txt file, which serve identical purposes to the instruction and description textfield inputs in the screenshot of ChatBotKit's UI below (see ChatBotKit's documentation).
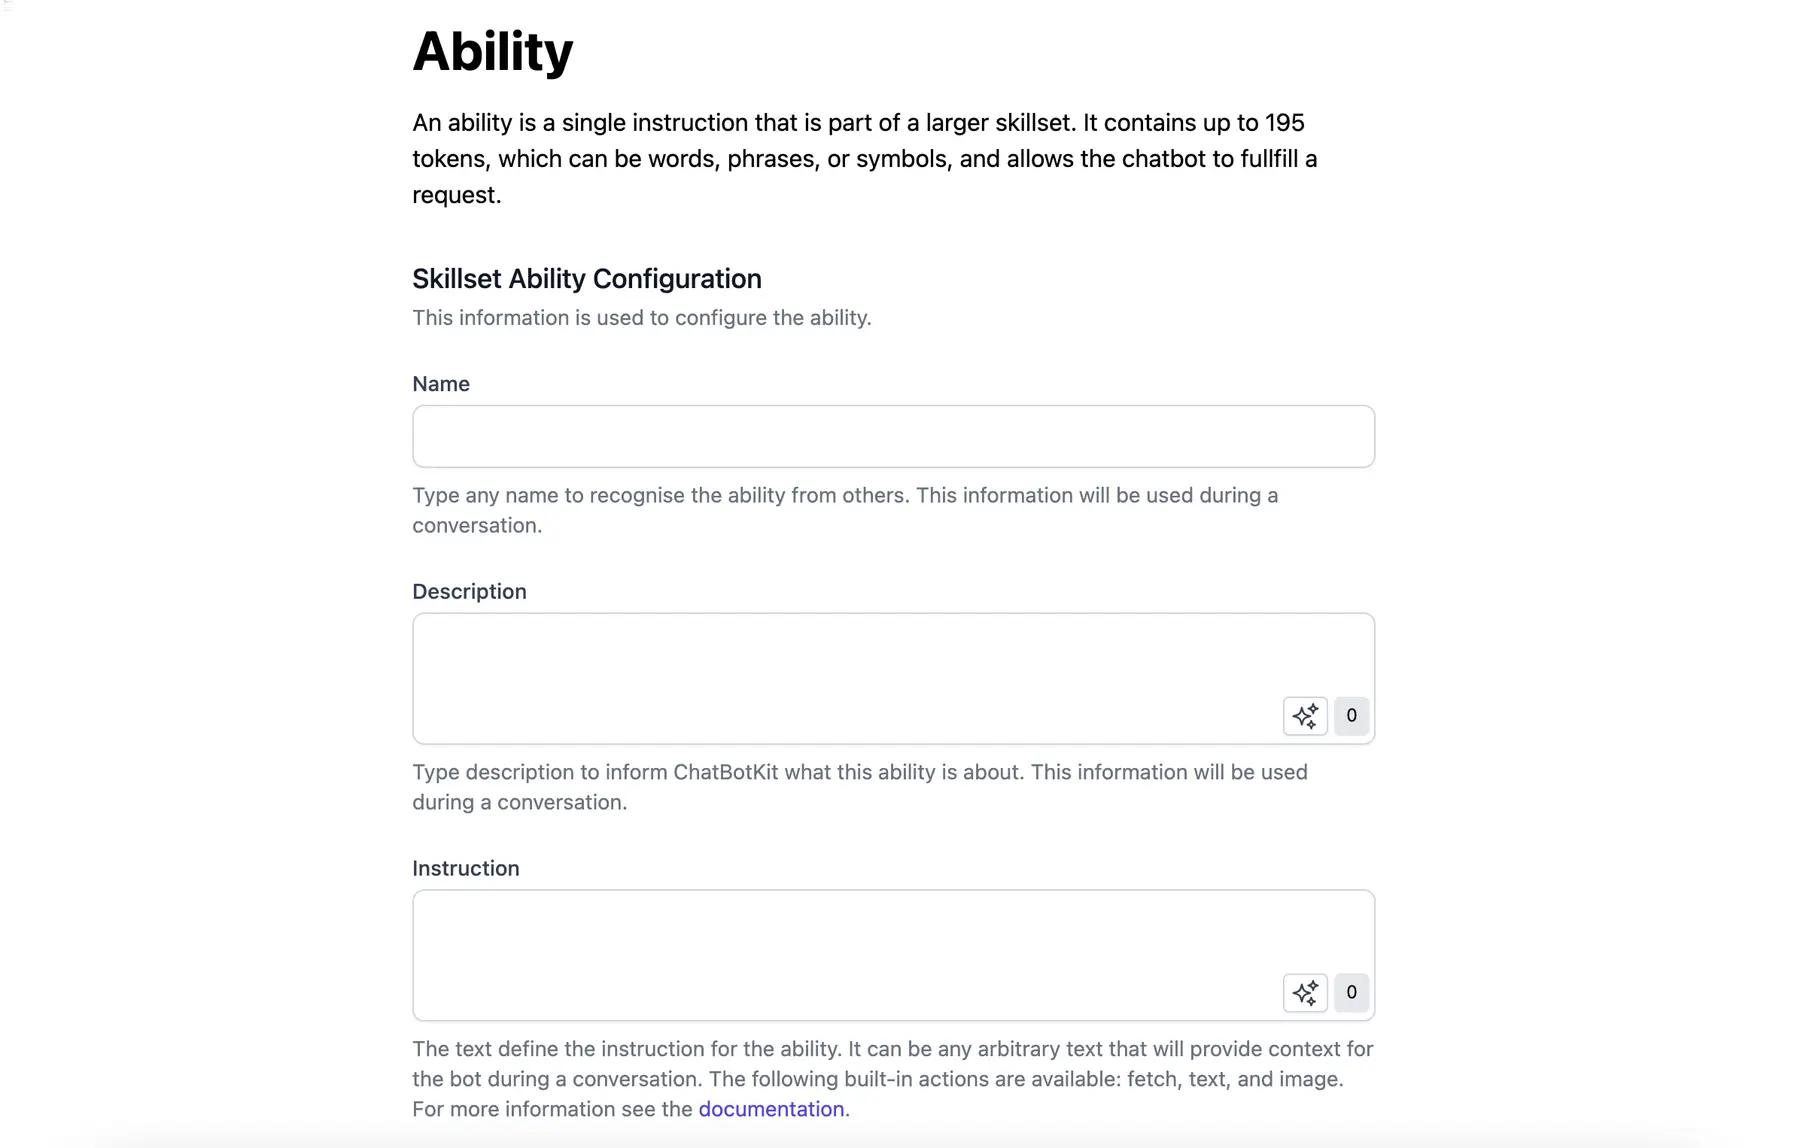
First, create the ability folder: landing-bot/abilities/notify-colin, then the landing-bot/abilities/notify-colin/description.txt file:
For every message the user sends, calculate a score
1-10 indicating their interest in InterBolt's professional
services. If the score is greater than 5, notify Colin.
Next, the instructions file at landing-bot/abilities/notify-colin/instruction.txt file:
Perform the following request:

```fetch
POST <%- API_ENDPOINT %>/ping-me HTTP/1.1
Content-Type: application/json
```
And lastly, define the API_ENDPOINT template variable in the landing-bot/variables.ts file:
// landing-bot/variables.ts

import type { VariablesBuilder } from "../../chatbotkit/lib/types";

const variables: VariablesBuilder = async () => {
  return {
    API_ENDPOINT: "https://yourapiendpointhere.com",
    ...,
    ...,
  };
};

export default variables;
If this worked, our bot will hit the endpoint specified in the fenced code block.
Deploy it
That covers everything in my bot folder. Time to deploy:
npm run sync
Finally, follow some instructions to embed a UI widget on the landing page:
<html>
<head>
    <title>My Site</title>
    <script
      src="https://static.chatbotkit.com/integrations/widget/v2.js" data-widget="{YOUR_WIDGET_ID}"></script>
</head>
Conclusion
And that's it. Hopefully my instructions were clear and the provided code was useful. If you'd like to see this idea taken further, follow me on twitter and share a link to this blog post in your feed with any feature requests.
If you have any questions or comments, feel free to reach out to me at [email protected]. And if you liked chatbot-sync, consider giving it a star ⭐.